
HARMA Artifacts Guide: Slots, Rates and Best Picks
How HARMA artifacts work: three slots, attunement rates, Blue Pyramid, Ruby Ore, Broken Sword, Nightmare Shard and Eternal Flame.
Artifacts are the heart of HARMA's combat system. You equip three, each with its own attunement chance, and every card you play rolls against them from left to right. The number of successes determines which tier of the card resolves. That means an artifact is never just a stat stick; it is a probability modifier, a build enabler and sometimes a tax on your third slot. This guide covers the confirmed artifacts in Early Access, how to evaluate them, and the picks that matter most. If you have not read the core rules, the attunement guide→ explains how the three slots resolve.
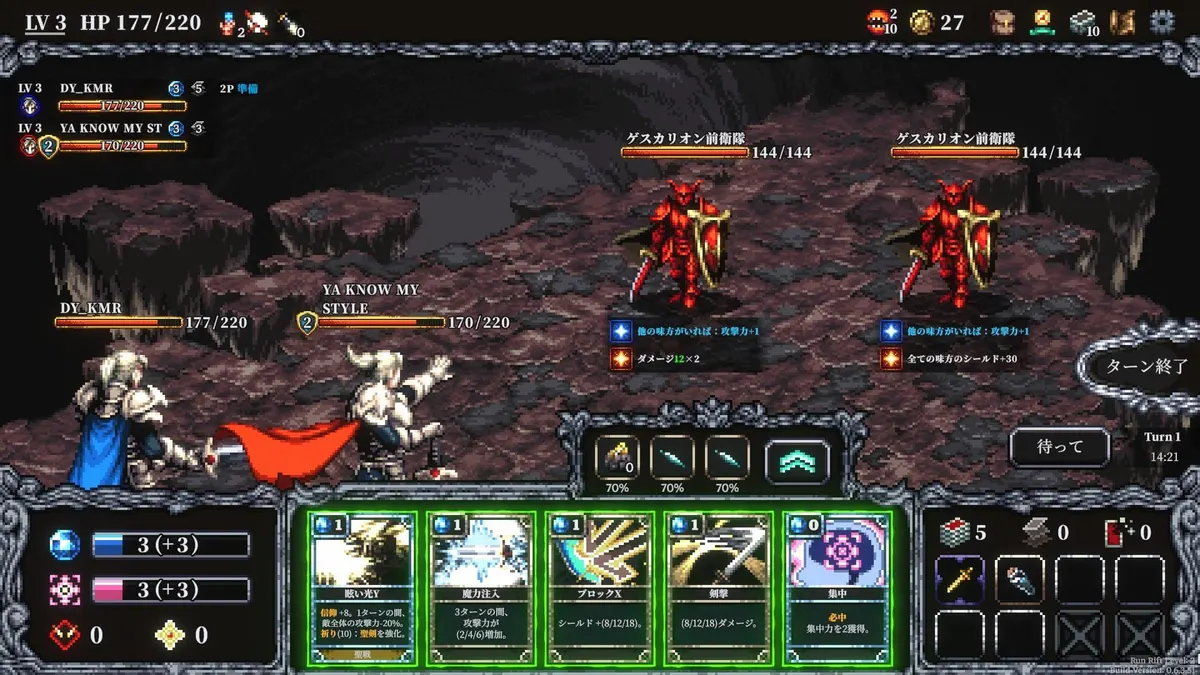
The Three-Slot Rule
You have three artifact slots. Each slot shows a success percentage. When you play a card, the game rolls each slot in order. One success gives the card's lowest listed tier, two gives the middle, three gives the maximum. If all three fail, the card does not resolve and returns to your hand.
The order matters because some artifacts care about position or about how many successes came before them. It also matters because your first slot is the one you want most reliable. A common mistake is putting a high-variance artifact first and a consistency artifact last; the high-variance roll gates everything behind it.
Confirmed Artifacts
| Artifact | Effect | Best use |
|---|---|---|
| Blue Pyramid | If the other artifacts fail, guarantees one success | Safety net for expensive cards |
| Ruby Ore | Heals HP on each successful attunement | Sustain in long fights |
| Tattered Cloak | Every 4 successful attunements grants a damage-reducing barrier | Defensive builds |
| Broken Sword | 55% attunement rate, +15% attack while equipped | High-risk damage, not for combo decks |
| Nightmare Shard | Stores 4 damage per card played; spend Focus to release it to all enemies | Secondary AoE engine |
| Eternal Flame | Doubles Burn on all enemies | Burn build centerpiece |
These are the names confirmed in official and preview materials. More artifacts exist; the launch build advertises 89, with more added in roadmap waves. Treat the table as a starting set, not the full list.
How to Evaluate an Artifact
Ask three questions:
- Does it raise or lower my key card's tier? A rate increase on your main attack is worth more than a flat stat on a card you play once.
- Does it require a build? Eternal Flame is mediocre without Burn application; it is game-winning with it.
- What does it cost? Every artifact occupies a slot. A safety net like Blue Pyramid is valuable, but it is still a slot you could use for a payoff.
A 10% higher success rate on your main card is often more damage than a flat +5 attack.
Blue Pyramid: The Starter Tax
Blue Pyramid guarantees one success if the other two artifacts fail. That is excellent for expensive cards and terrible for decks that need three successes. It effectively raises your floor while lowering your ceiling, because one of your three slots is spent on insurance.
Use it early. Replace it once your deck has enough redundancy or when you are chasing a three-success payoff. Do not keep it forever out of habit.
Broken Sword: Read the Fine Print
Broken Sword has a 55% attunement rate, lower than the baseline, and gives +15% attack while equipped. That trade is good for decks that attack often and can afford a miss. It is bad for combo decks, because a missed setup roll can break the entire turn. If you take it, put it in a slot where a failure is least catastrophic, and do not pair it with a card that requires three successes to function.
Eternal Flame: Build Around It
Eternal Flame doubles Burn on all enemies. On its own, it does nothing. With a Burn deck, it turns modest application into a boss-killing engine. If you find it early, commit to Burn and prioritize multi-target application. If you find it late with no Burn cards, do not force the pivot.
Artifact Upgrades
The Alchemist can upgrade artifacts as one of its services. An upgraded artifact often gains a higher rate or an additional effect. Because artifacts define your card tiers, an artifact upgrade can be worth more than a card upgrade. Check the price and the result before committing; the economy guide→ covers the spending order.
Co-op Artifacts
In co-op, attunement uses the team's artifact setup. That means one player's artifact choices can affect another player's card resolution. Coordinate before the boss: decide who brings the consistency artifact and who brings the payoff. Do not stack three Blue Pyramids; the safety nets do not compound well. The co-op guide→ covers the details.

FAQ
How many artifacts can I equip? Three.
Do artifact effects stack? Effects that modify the same roll can stack, but the exact interaction depends on the artifact. Read the description and test in a low-risk fight.
Is Blue Pyramid good? It is a strong early safety net and a poor late-game slot if your deck no longer needs insurance.
Official source: HARMA on Steam ↗
Sources
- HARMA on Steam ↗
- HARMA Steam news and patch notes ↗
- HARMA Early Access roadmap on Gematsu ↗
- HARMA launch report on AUTOMATON ↗